Here's a script that has a line multiplied 8 times, each to reflect the subnet it's querying and then outputting the results to a specific CSV file with the network subnet it just queried.
get-vm | select Name,@{N="IPAddress";E={@($_.guest.IPAddress[0])}},@{N="OS";E={@($_.Guest.OSFullName)}} | where {$_.IPAddress -like "192.168.6.*"} | export-csv -path c:\tmp\vmware\VM_IP_6_Addresses.csv -notypeinformation
get-vm | select Name,@{N="IPAddress";E={@($_.guest.IPAddress[0])}},@{N="OS";E={@($_.Guest.OSFullName)}} | where {$_.IPAddress -like "192.168.7.*"} | export-csv -path c:\tmp\vmware\VM_IP_7_Addresses.csv -notypeinformation
get-vm | select Name,@{N="IPAddress";E={@($_.guest.IPAddress[0])}},@{N="OS";E={@($_.Guest.OSFullName)}} | where {$_.IPAddress -like "192.168.8.*"} | export-csv -path c:\tmp\vmware\VM_IP_8_Addresses.csv -notypeinformation
get-vm | select Name,@{N="IPAddress";E={@($_.guest.IPAddress[0])}},@{N="OS";E={@($_.Guest.OSFullName)}} | where {$_.IPAddress -like "192.168.10.*"} | export-csv -path c:\tmp\vmware\VM_IP_10_Addresses.csv -notypeinformation
get-vm | select Name,@{N="IPAddress";E={@($_.guest.IPAddress[0])}},@{N="OS";E={@($_.Guest.OSFullName)}} | where {$_.IPAddress -like "192.168.11.*"} | export-csv -path c:\tmp\vmware\VM_IP_11_Addresses.csv -notypeinformation
get-vm | select Name,@{N="IPAddress";E={@($_.guest.IPAddress[0])}},@{N="OS";E={@($_.Guest.OSFullName)}} | where {$_.IPAddress -like "192.168.12.*"} | export-csv -path c:\tmp\vmware\VM_IP_12_Addresses.csv -notypeinformation
get-vm | select Name,@{N="IPAddress";E={@($_.guest.IPAddress[0])}},@{N="OS";E={@($_.Guest.OSFullName)}} | where {$_.IPAddress -like "192.168.13.*"} | export-csv -path c:\tmp\vmware\VM_IP_13_Addresses.csv -notypeinformation
get-vm | select Name,@{N="IPAddress";E={@($_.guest.IPAddress[0])}},@{N="OS";E={@($_.Guest.OSFullName)}} | where {$_.IPAddress -like "192.168.14.*"} | export-csv -path c:\tmp\vmware\VM_IP_14_Addresses.csv -notypeinformation
get-vm | select Name,@{N="IPAddress";E={@($_.guest.IPAddress[0])}},@{N="OS";E={@($_.Guest.OSFullName)}} | where {$_.IPAddress -like "192.168.15.*"} | export-csv -path c:\tmp\vmware\VM_IP_15_Addresses.csv -notypeinformation
Monday, November 23, 2015
PowerCLI script to query a VLAN for specific VM members.
Here's a script that will show you all the VMs that belong to a specific VLAN within vCenter. This is handy when you have multiple VLANs created and don't know which VMs belong to which VLAN.
#Production_VLAN is the name of the VLAN you are querying
$vms=get-view -viewtype virtualmachine
foreach($vmview in $vms )
{
$ntwkview=get-view -id $vmview.network
foreach($ntwkentry in $ntwkview){
if ($ntwkentry.name -eq "Production_VLAN")
{
$vmview.name
}
}
}
PowerCLI script to list NIC address information for VM's
Here's a script to find the network information for all the VM's in your Clusters. This will list the VM Name, MACaddress, Network/VLAN, DHCP, IP address, Subnet Mask.
#If you only want a specific VM NIC, change "Get-Cluster | Get-VM" to "Get-VM "VM_Name"
&{foreach($vm in (Get-Cluster | Get-VM)){
$vm.ExtensionData.Guest.Net | Select @{N="VM";E={$vm.Name}},MacAddress,Network,
@{N="DHCP";E={$_.IpConfig.Dhcp.Ipv4.Enable}},
@{N="IP";E={$_.IpAddress[0]}},
@{N="Subnet Mask";E={
$dec = [Convert]::ToUInt32($(("1" * $_.IpConfig.IpAddress[0].PrefixLength).PadRight(32, "0")), 2)
$DottedIP = $( For ($i = 3; $i -gt -1; $i--) {
$Remainder = $dec % [Math]::Pow(256, $i)
( $dec - $Remainder) / [Math]::Pow(256, $i)
$dec = $Remainder
} )
[String]::Join('.', $DottedIP)
}}
}}
PowerCLI script to match a rogue IP address to a VM.
Here's a quick way of finding which system has a specified IP address assigned to it. You have a rogue IP address and don't know which VM is assigned to it.
$match_address = "192.168.10.27"
Get-VM | %{
$vmIPs = $_.Guest.IPAddress
foreach($ip in $vmIPs) {
if ($ip -eq $match_address) {
"Found VM with matching address: {0}" -f $_.Name
}
}
}
$match_address = "192.168.10.27"
Get-VM | %{
$vmIPs = $_.Guest.IPAddress
foreach($ip in $vmIPs) {
if ($ip -eq $match_address) {
"Found VM with matching address: {0}" -f $_.Name
}
}
}
PowerCLI script to query VM for SnapShots and sizes.
Here's a simple script to query all your VM's that currently have snapshots. 5 columns are created starting from VM, SnapShotName, Snapshot Description, Size (Snapshot), Date Created.
$Report = Get-VM | Get-Snapshot | Select VM,Name,Description,@{Label="Size";Expression={"{0:N2} GB" -f ($_.SizeGB)}},Created
If (-not $Report)
{ $Report = New-Object PSObject -Property @{
VM = "No snapshots found on any VM's controlled by $VIServer"
Name = ""
Description = ""
Size = ""
Created = ""
}
}
$Report = $Report | export-csv -path c:\tmp\vmware\snapshotsDAYMONTH.csv
Append "| export-csv -path c:\tmp\vmware\vm_tools_upgrade.csv" to the end of the script for viewing and reporting purposes.
PS > Snapshot.ps1
PowerCLI script to show VM's needing VMware Tools upgraded.
I started looking for a way to inventory all of our VM's currently running within our 6-7 clusters.
Most of our VM's had the latest version of VMware tools but there were plenty that were out of compliance. I didn't want to take the time to individually check each VM (500+ VM's) so after some searching I found a script that showed me the tools version on the VM's that were out of compliance.
# Select Cluster you wish to scan "User VMs"#
PS > get-view -ViewType virtualmachine -SearchRoot (get-cluster "User VMs").id -Filter @{'Summary.Guest.ToolsVersionStatus'='guestToolsNeedUpgrade'} | Select Name,@{N='VMware Tools Version';E={$_.Config.Tools.ToolsVersion}},@{N='Tools Status';E={$_.Summary.Guest.ToolsVersionStatus}}
Append "| export-csv -path c:\tmp\vmware\vm_tools_upgrade.csv" for viewing and reporting purposes.
The output would show:
Name VMware Tools Version Tools Status
VM_1 8394 guestToolsNeedUpgrade
VM_2 9344 guestToolsUpgrade
PowerCLI script to collect "Computers that have a specific OS installed"
I started looking for a way to inventory all of our VM's currently running within our 6-7 clusters. There was such a variety of OS's running that I didn't want to take the time to individually check the setting on each VM (500+ VM's). So after looking at different scripts, I took a combination of two or three and after trail and error I was able to filter my search results for exactly what I was looking for. In the end the script basically spits out the version of OS currently installed and IP Address of the VM. The IP address was critical in my search because we are running several different subnets and I needed to know exactly where the VM resided.
I then exported the results to my local C: drive in CSV format for viewing and reporting purposes.
# The *Cent* is changed to reflect what flavor of OS you may be looking for. *Red Hat*, *Server*, *Workstation*,etc..#
PS > get-vm | get-view | where {$_.Guest.GuestFullName -like "*Cent*"} | select Name,@{N="OS";E={@($_.Guest.GuestFullName)}},@{N="IP";E={@($_.Guest.IPAddress)}} | export-csv -path c:\tmp\vmware\CentOS.csv
Tuesday, November 17, 2015
VMWare View Windows 7 Optimization Install
Preparing a new virtual machine
1. Create New Virtual Machine – FILE > NEW > VIRTUAL MACHINE (CTRL+N)
2. Under Configuration select CUSTOM.
3. Select a Name, Folder, Host, Cluster, and Storage.
4. Virtual Machine Version: vmx-10
5. Under Guest Operating System: Windows
a. Version: Windows 7 64bit
6. Number of virtual sockets: 1
a. Number of cores per virtual socket: 1
b. Total number of cores: 1
7. Memory Configuration 4GB
8. Select which Network (VLAN) and under Adapter select VMXNET 3.
9. SCSI Controller: LSI Logic SAS
10. Disk: Create a new virtual disk
a. Configure disk size to 32GB THIN provisioned.
11. Advanced Options keep defaults
12. Check “Edit the virtual machine settings before completion” and then Continue
13. Video Card: Do not “Auto detect” , set to 2 displays and 128 MB video memory Video Card: Enable 3D support
14. Remove Floppy Drive 1.
15. Go to Boot Options and check "The next time the virtual machine boots, force entry into the BIOS setup screen.
16. Click Finish
17. Power on virtual machine and open Console – virtual machine should be loaded into the BIOS screen.
BIOS.
1. Under MAIN, Legacy Diskette A: change to Disabled.
2. Keyboard Features: change Numlock to ON.
3. Under ADVANCED, I/O Device Configuration: disable all Serial, and Parallel ports, as well as Floppy Controller.
4. Exit and Save Changes.
5. After Reboot Power Off and Enter Edit settings again.
6. CD/DVD: Device Type Datastore ISO File
a. Select the WIN764bit ISO
b. Check Connect at Power On
7. Click on OPTIONS tab and then General, UN-Check "Enable logging".
8. Finish
9. Power On
Installing Windows 7
1. Boot from your Windows 7 installation media.
2. Click the "Next" button.
3. Click the "Install now" button.
4. Accept the terms and click the "Next" button.
5. Choose "Custom: Install (advanced)."
6. At “Where do you want to install Windows” screen, press Shift + F10 to open a command prompt.
7. At the command prompt, enter following commands:
a. Diskpart
b. Select disk 0
c. Create Partition Primary
d. assign
e. Exit
f. Exit
8. Click Refresh
9. Select "Disk 0 Partition 1"
10. Complete the install on the disk formatted with the 8192 allocation size.
Installing VMWare Tools
1. Right click on virtual machine and select GUEST > Install/Upgrade VMware Tools.
2. Don’t Restart instead Shutdown virtual machine.
3. Enter Edit Settings once again and remove ISO on CD and then Remove CD/DVD Drive
2. Don’t Restart instead Shutdown virtual machine.
3. Enter Edit Settings once again and remove ISO on CD and then Remove CD/DVD Drive
Windows 7 Optimization
1. Go to Control panel and turn off all Action Center Settings and User Account Controls
2. Run Windows updates
3. After updates run Command.bat as Administrator found in the VMView Windows 7 Optimization http://www.vmware.com/resources/techresources/10157. I have also included it as an attachment.
4. Turn off Drive Indexing
a. Open the Start Menu
b. Click Computer
c. Right click C: drive and select Properties and uncheck drive indexing
d. Click apply changes to drive C:\, subfolders and files (ignore all when comes up)
5. Shrink Page File
a. Open the Start Menu
b. Right click Computer
c. Click Properties
d. Click Advanced System Settings (it’s on the left side)
e. Under performance click Settings
f. Go to the Advanced tab
g. Under Virtual memory click Change
h. Uncheck the "Automatically manage paging file" box at the top
i. Select the C: drive
j. Click "Custom size"; initial size 512MB, maximum size 2048MB
k. Click "Set"
l. Click OK
m. Click OK
n. Start closing Open Windows and it will ask to restart.
6. RESTART Virtual Machine
7. Change Power Options
a. Open the Start Menu, in the search line, type Power Options and press Enter
b. Select the "High performance" power plan
c. Click "change plan settings"
d. Click "change advanced power settings"
e. Expand the Hard disk option and change setting to "never"
f. Expand the Sleep option and change setting to "never"
g. Click OK
8. Uninstall Tablet PC, Windows Gadgets, and Media Center
a. Open Control Panel > Programs and Features > Turn Windows features on or off.
b. Uncheck Media Center, Tablet PC, and Windows Gadgets.
9. Disable Windows Themes
a. Control Panel > Personalization > Select Windows Classic.
10. Set Run for Best Performance
a. Right click on Computer and select Properties
b. Select Advanced system settings
c. Under the Advanced Tab, click Settings next to Performance
d. Select "Adjust for best performance"
11. Disable System Maintenance
a. Control Panel > Troubleshooting > Change Settings and select OFF under Computer Maintenance.
12. Disable Screensaver 1.Control Panel > Personalization > Screen Saver and change to NONE.
13. Disable Windows Sounds 1.Control Panel > Personalization > Sounds > and change Sound Scheme to No Sounds.
14. Speed up the Menu Show delay time
a. Open Regedit
b. Go to: HKEY_CURRENT_USER\Control Panel\Desktop
c. Modify MenuShowDelay from 400 to 1
15. Disable Un-needed Services
a. Telephony
b. Volume Shadow Copy Service – Not needed since System Restore is disabled.
16. Startup and Recovery
a. Open the Start Menu
b. Right click Computer
c. Click Properties
d. Click Advanced System Settings (it’s on the left side)
e. Under Startup and Recovery click Settings
f. Set the “Time to display list of operating systems” to 1
g. Disable “Write an event to the system log”
h. Click OK
i. Click OK
17. Boot GUI
a. Run msconfig
b. Under Boot tab Enable “No GUI boot” and “Base Video”
18. Restart
GPO Changes
19. Disable success logins
a. Computer Configuration > Policies > Windows Settings > Security Settings > Local Policies > Audit Policy
b. Under Audit account logon events settings Properties select the Security Policy Setting tab.
c. Select the Failure checkbox.
20. Set maximum Event Log size
a. Computer Configuration > Administrative Templates > Event Log Service > Specific Event Log
b. Maximum application, security, and system log size = 1024
21. Empty IE temp files
a. User Configuration > Administrative Templates > Windows Components > Internet Explorer > Internet Control Panel > Advanced Page
b. Empty Temporary Internet Files folder when browser is closed = Enabled
22. Disabled IE First Run Customize Wizard
a. User Configuration > Administrative Templates > Windows Components > Internet Explorer
b. Prevent performance of First Run Customize settings – Enabled
23. Disable RSS Feeds
a. User Configuration > Administrative Templates > Windows Components > RSS Feeds
b. Turn off background sync feeds and web slices = Enabled
24. Disable Windows Slideshow
a. User Configuration > Administrative Templates > Windows Components >Windows Slideshow
b. Turn off Windows Slideshow = Enabled
25. Turn off Build-to-Lossless feature
a. Computer Configuration > Administrative Templates > Classic Administrative Templates (ADM) > PCoIP Session Variables
b. Turn off Build-to-Lossless feature = Enabled
26. Limit audio bandwidth
a. Computer Configuration > Administrative Templates > Classic Administrative Templates (ADM) > PCoIP Session Variables
b. Change Configure the PCoIP session audio bandwidth limit to 100
27. Set PCoIP frame rate and image quality
a. Computer Configuration > Administrative Templates > Classic Administrative Templates (ADM) > PCoIP Session Variables
b. Maximum Initial image quality = 70
c. Minimum Image Quality = Leave default
d. Maximum Frame Rate = 15
Friday, November 13, 2015
PowerCLI script to collect "Computers that have not logged on since specified date"
I needed to collect and Inventory all VM's that have not logged on since a specified date. In my case I was looking for systems that hadn't logged on in the past 90 days. Substitute the "$DaysInactive" with what suits your case.
# Gets time stamps for all computers in the domain that have NOT logged in since after specified date
$domain = "YouDomain.Name"
$DaysInactive = 90
$time = (Get-Date).Adddays(-($DaysInactive))
# Get all AD computers with lastLogonTimestamp less than our time
Get-ADComputer -Filter {LastLogonTimeStamp -lt $time} -Properties LastLogonTimeStamp |
# Output hostname and lastLogonTimestamp into CSV
select-object Name,@{Name="Stamp"; Expression={[DateTime]::FromFileTime($_.lastLogonTimestamp)}} | export-csv -path c:\tmp\vmware\LastLogon_90_Days.csv -notypeinformation
Tuesday, October 20, 2015
Understanding VMware CPU over commitment
Thanks to Manish Kumar Jha aka Alex Hunt for providing this insight to over commitment.
Over commitment in its simplest term means allocating more resources to virtual workloads then what is available at physical level. Most common resources that are over committed are memory and cpu.
A simple example of over commitment can be running 3 VM each with 4 GB RAM on an Esxi host which has only 8 GB RAM. In this case we have allocated 12 GB RAM to all VM’s collectively but at physical level (Esxi host) we have only 8 GB RAM available.
It is a general belief by most novice VMware admins that allocating more resources to virtual machines means better performance. When I started working with VMware I also used to think in the same way.
It was the vSphere Optimize and Scale training, where I learned this is not true and how over commitment can badly affect VM performance.
In this post I am trying to demonstrate the negative affects of CPU over commitment.
Before diving into demonstration lets recall a few terms which will help understanding concepts more clearly.
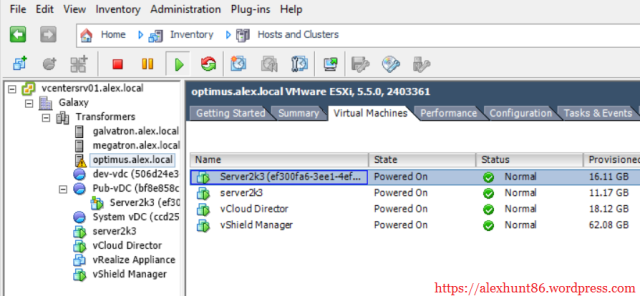
The host on which these VM are running has 6 GB of RAM and has 8 CPU X 2.4 GHz.
CPU allocation for the VM’s are as follows:
Server 2003-1: 1 vCPU
Server 2003-2: 1 vCPU
RHEL Server: 1 vCPU
vShield Manager: 2 vCPU
Lets begin with the demonstration:
1: Power on all VM’s
2: Run Esxtop

In general:
4: Change the number of cores per socket to 8 for both VM
Select 1 sockets and 8 cores per socket to make total vCPU=8


5: Power on the 2 VM and look at the esxtop stats again
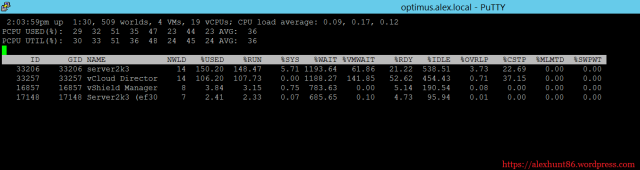
Gees, look at the %RDY and %CSTP time.
For Linux VM there is one script available at GitHub
Note: Before running the cpuload.sh script make sure the Linux VM has ‘stress‘ and ‘cpulimit‘ rpm’s installed
Copy the code from GitHub and save it as cpuload.sh and run following commands:
# chmod +x cpuload.sh
# ./cpuload.sh [cpu load in percent] [duration in seconds]
For e.g to force cpu utilization to 75% for 50 seconds run the command as shown below:
# ./cpuload.sh 75 50
On running cpuload.sh on linux VM, if you fire top command you will see the cpu stats as below:
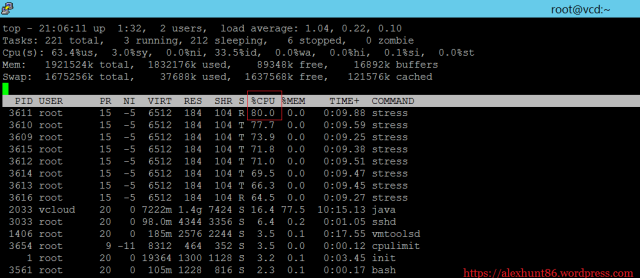
If we look at the esxtop stats, we will see something like as shown below:

Holy crap. Look at the jump in %RDY and %CSTP values
For Windows OS there is a nice utility called Load Storm. This utility can be downloaded from Here
Note: Load Storm requires dotnet framework 3.5 to be pre-installed.

To generate load on cpu adjust the Number of threads value and Approx core load per thread. Also you can choose the checkbox Generate load for if you wish to keep cpu busy for more than default one minute.
On generating 100% workload on cpu, the windows reported CPU utilization as 100%

Lets see the esxtop stats

As expected you can see the rise in value for %RDY and %CSTP for Windows VM
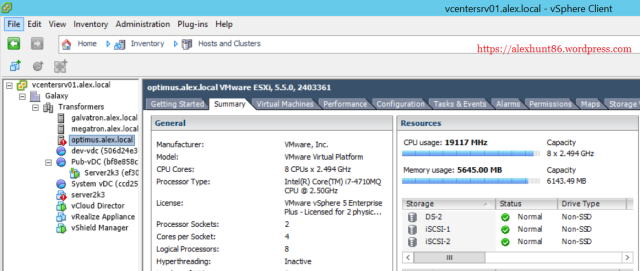
If we check the Esxi host CPU stats in GUI we can see CPU is almost maxed out
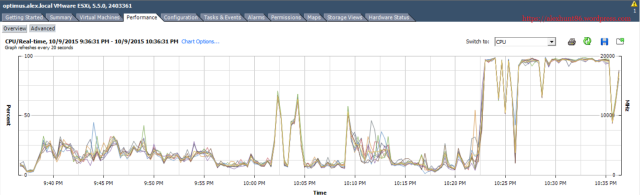
Also the performance chart will show a sudden rise in CPU utilization when we have run the cpu load script on both windows and linux vm together.
In my case GUI was reporting almost full utilization of physical cpu. But in production environment it is very common to see Esxi host utilization somewhere near 50-60% but still VM’s are reporting high %RDY and %CSTP values in Esxtop.
High %RDY and high %CSTP indicate an over-allocation of CPU resources – i.e. too many vCPU for the job at hand
Now I am going to power off the RHEL and Windows VM and set the vCPU to 2 and re-run the cpu load scripts to see if there is any difference in %RDY and %CSTP values.
I choosed to run 4 threads on 2 vCPU in windows VM.


After changing the cpu count, esxtop has following readings

You can see there is significant drop in %RDY and %CSTP values for both VM’s.
Conclusion
Assigning fewer vCPUs to a VM than it has threads is more efficient than assigning more vCPUs; but if we assign the exact number of vCPUs as threads, we risk increasing %RDY and %CSTP if we over commit the total number of vCPUs in the environment.
Over commitment in its simplest term means allocating more resources to virtual workloads then what is available at physical level. Most common resources that are over committed are memory and cpu.
A simple example of over commitment can be running 3 VM each with 4 GB RAM on an Esxi host which has only 8 GB RAM. In this case we have allocated 12 GB RAM to all VM’s collectively but at physical level (Esxi host) we have only 8 GB RAM available.
It is a general belief by most novice VMware admins that allocating more resources to virtual machines means better performance. When I started working with VMware I also used to think in the same way.
It was the vSphere Optimize and Scale training, where I learned this is not true and how over commitment can badly affect VM performance.
In this post I am trying to demonstrate the negative affects of CPU over commitment.
Before diving into demonstration lets recall a few terms which will help understanding concepts more clearly.
- pCPU- Total physical CPU X Number of cores. In this example I have a host with 2 CPU and 2 cores and thus total of 4 pCPU.
- vCPU- CPU’s allocated to a Virtual Machine.
- Esxtop- Performance analysis utility, usually run from Esxi Console or SSH.
- %RDY- CPU Ready Time is the amount of time a virtual machine is ready to use CPU but was unable to schedule time because all physical CPU are busy.
- %CSTP- The percentage of time that the virtual machine is ready to execute commands but that it is waiting for the availability of physical CPU’s as the virtual machine is configured to use multiple vCPUs.
- %WAIT- It is the percentage of time the virtual machine was waiting for some VMkernel activity to complete (such as I/O) before it can continue.
- %IDLE- The percentage of time a world is in idle loop.
The host on which these VM are running has 6 GB of RAM and has 8 CPU X 2.4 GHz.
CPU allocation for the VM’s are as follows:
Server 2003-1: 1 vCPU
Server 2003-2: 1 vCPU
RHEL Server: 1 vCPU
vShield Manager: 2 vCPU
Lets begin with the demonstration:
1: Power on all VM’s

2: Run Esxtop

In general:
- %RDY (CPU Ready) should be low
- %CSTP should be 0.00
- %IDLE should be high – indicating high percentages of resources waiting for something to do
4: Change the number of cores per socket to 8 for both VM
Select 1 sockets and 8 cores per socket to make total vCPU=8


5: Power on the 2 VM and look at the esxtop stats again

Gees, look at the %RDY and %CSTP time.
- High %RDY value indicates that vCPUs are waiting for actual physical CPUs to schedule their threads.
- High %CSTP indicates that ESXi is asking the vCPUs to wait – A.K.A. co-stopping them for scheduling purposes.
For Linux VM there is one script available at GitHub
Note: Before running the cpuload.sh script make sure the Linux VM has ‘stress‘ and ‘cpulimit‘ rpm’s installed
Copy the code from GitHub and save it as cpuload.sh and run following commands:
# chmod +x cpuload.sh
# ./cpuload.sh [cpu load in percent] [duration in seconds]
For e.g to force cpu utilization to 75% for 50 seconds run the command as shown below:
# ./cpuload.sh 75 50
On running cpuload.sh on linux VM, if you fire top command you will see the cpu stats as below:

If we look at the esxtop stats, we will see something like as shown below:

Holy crap. Look at the jump in %RDY and %CSTP values
For Windows OS there is a nice utility called Load Storm. This utility can be downloaded from Here
Note: Load Storm requires dotnet framework 3.5 to be pre-installed.

To generate load on cpu adjust the Number of threads value and Approx core load per thread. Also you can choose the checkbox Generate load for if you wish to keep cpu busy for more than default one minute.
On generating 100% workload on cpu, the windows reported CPU utilization as 100%

Lets see the esxtop stats

As expected you can see the rise in value for %RDY and %CSTP for Windows VM
If we check the Esxi host CPU stats in GUI we can see CPU is almost maxed out

Also the performance chart will show a sudden rise in CPU utilization when we have run the cpu load script on both windows and linux vm together.

In my case GUI was reporting almost full utilization of physical cpu. But in production environment it is very common to see Esxi host utilization somewhere near 50-60% but still VM’s are reporting high %RDY and %CSTP values in Esxtop.
High %RDY and high %CSTP indicate an over-allocation of CPU resources – i.e. too many vCPU for the job at hand
Now I am going to power off the RHEL and Windows VM and set the vCPU to 2 and re-run the cpu load scripts to see if there is any difference in %RDY and %CSTP values.
I choosed to run 4 threads on 2 vCPU in windows VM.


After changing the cpu count, esxtop has following readings

You can see there is significant drop in %RDY and %CSTP values for both VM’s.
Conclusion
Assigning fewer vCPUs to a VM than it has threads is more efficient than assigning more vCPUs; but if we assign the exact number of vCPUs as threads, we risk increasing %RDY and %CSTP if we over commit the total number of vCPUs in the environment.
Friday, April 10, 2015
Enable RSS (Receive Side Scaling) on Windows Virtual Machines
A nice feature of the VMXNet3 vNIC in vSphere is Receive Side Scaling.
For detailed info, check out http://technet.microsoft.com/en-us/network/dd277646.
I’ll try to summarize it here:
Without RSS, all incoming network traffic is handled by CPU 0. This could cause a bottleneck on high Network IO machines resulting in an overloaded CPU 0 (where CPU 1, 2, 3, … might be idle). With RSS enabled, incoming network traffic is handled by all available CPUs.
RSS is available inside a VM on vSphere. But, you’ll need to have the VMXNet3 adapter in your VM.
Let me show you how to enable this on a Windows 2008 R2 VM.
For starters, make sure your VM runs on Hardware Version 7. Second, you’ll need more than one vCPU in the VM. After all, it would be useless to enable RSS on a single vCPU machine.

Next, verify that the vNIC is of type VMXNET3. If it is not, remove the current vNIC (make a note of the IP address) and add a new one of type VMXNET3.

That’s it for the configuration on the vSphere side. Now we’ll have to enable it inside the VM. We’ll use a Windows 2008 R2 machine for this, but know that RSS is available on 2003 SP2 and 2008 as well.
By default, RSS is enabled on Windows 2008 R2. This can be checked by running the following command:
netsh int tcp show global

You’ll notice Receive-Side Scaling State is enabled.
Allright, so let’s test this!
To test RSS, i have 2 VM’s running iPerf. One is the client (sender) and the other is the server (receiver). I start iPerf with 16 concurrent threads to generate lots of network traffic. If all goes well, we should see RSS in action on the iPerf server.
I’ll fire up perfmon.exe and monitor the % Processor Time of CPU 0 and 1. When iPerf kicks in and receive network packets, we immediately see CPU activity:

Whoops, looks like CPU 0 (the red one) is doing most of the work and CPU 1 (the green one) isn’t allowed to play along…
So RSS is enabled on the Operating System, but it looks like it’s not functioning. The fact is thatRSS must be enabled on the vNIC inside the VM as well! For that, open up Device Manager and open the Advanced Properties of the vmxnet3 Ethernet Adapter.
Look for the RSS property and set it to Enabled (it is Disabled by default).

Let’s rerun the iPerf test and check CPU 0 and CPU 1 in perfmon:

That’s more like it! All CPUs are playing along now and we have just removed a potential bottleneck!
Bottom line:
– RSS is available on the VMXNET3 vNIC adapter
– RSS is enabled by default on Windows 2008 R2
– You have to explicitly enable RSS in Device Manager on the VMXNET3 adapter.
It’s up to you to enable RSS, but personally, i would enable it if you have high amounts of incoming network traffic and you see an overloaded CPU 0.
Tuesday, February 10, 2015
VMware Horizon View Admin dashboard for vCenter Server 5.1 displays the message: VC service is not working properly or Bad username or password
- After upgrading to vCenter Server 5.1, in the VMware Horizon View Admin dashboard you see the message:
VC service is not working properly
- All other vCenter Server related functions fail, such as powering on and off VDI desktops, or recomposing, adding, or deleting linked clone desktops.
- When you attempt to change or add (for new VDI environments) the vCenter Server user password or username using View Configuration > Servers > Virtual Center on the View Admin page, the attempt fails with the error:
bad user name or password Attempting to accept the vCenter Server certificate in the View Manager Administrator portal dashboard fails.You see the error:
Vmware View Cannot connect to the vCenter Server{0} because the user name or password is not valid
Solution #1
To resolve this issue, you must add the View domain to the Single Sign-On (SSO) default domain list in the vSphere Web Client.Notes:
- Both Single Sign-On and the Web Client services must be running on the vCenter Server machine.
- Single Sign-On is a required program for vCenter Server and Web Client program must also be installed on the vCenter Server machine for the Web Client service to run.
- VMware recommends that you run vCenter Server 5.1b (release 947939) or later to address any other possible issues.
To add the View domain to the Single Sign-On (SSO) default domain list:
- Log in to the vCenter Server using the vSphere Web Client (
https://FQDN_of_vCenter_Server:9443/vsphere-client) as an SSO administrator.
Note: By default, the SSO administrator user isadmin@system-domainand the password is set at the time of the Web Client install. To unlock or reset the vCenter SSO administrator password, see Unlocking and resetting the vCenter Single Sign-On administrator password (2034608).
- In the home page, click Administration > Configuration (under Sign-on and Discovery).
- In the right side, click the line with the View domain.
Note: If the View domain is not the same as the vCenter Server domain, you must add the View domain using the add icon at the top of the page.
- Add the View domain to the default domain list using the icon at the top of the page. After adding the View domain, it appears at the bottom of the list of default domains.
- Using the up arrow, move the View domain so that it is one above the system-domain entry.
- Click the save icon and log out of the page.
After completing these steps, the vCenter Server entry in the View
Admin dashboard turns green and all vCenter Server related functions on
the View Admin page return to normal, and the connection broker(s) are
now able to communicate with this vCenter Server.
Solution #2
Go to the View Configuration > Servers > Virtual Center on the View Admin page, change the logon account to another domain admin account(With Domain Admin Privileges), set the password and verify. Once the account is verified and the status console shows that all services are green, go back and change the logon account to some other domain admin account if needed.
In our case, one of our Admins quit and we had to go around and change all domain service account passwords. Once we did this the connection from View to vCenter broke. Had we changed the view logon account to some other valid domain account prior to changing the existing account password, we could have avoided this issue. Once we changed the logon account we went back and used the original service account with the updated password and we were back in business!
Monday, February 9, 2015
How to log in to Single Sign ON SSO in vSphere 5.5 (URL)
I just installed vSphere 5.5 and my vCenter server was already in my domain and I
expected to be able to log in with my domain administrator account.
Unfortunately it was not the case. To solve the issue I wanted to log in
with the vSphere Web Client to validate my permissions and that my
domain vclass.local was an identity source. In vSphere 5.1 the SSO
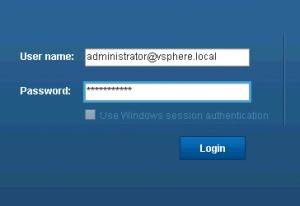
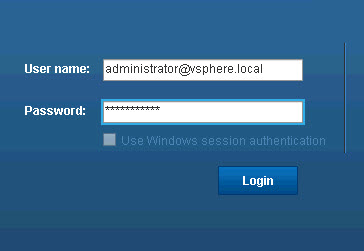
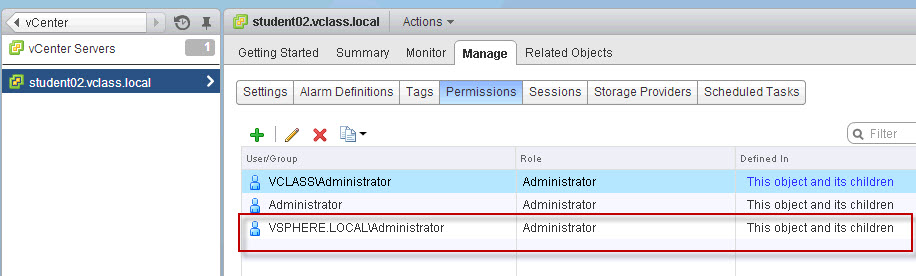
administrator was called admin@system-domain this is no longer the case. You need to log in with administrator@vsphere.local and
the password you defined under installation of the SSO server. When I
logged in with this user I was able to configure my domain as an
identity source and give access to my domain admins access to vCenter Server.
You can access the vCenter Web Client on the following url:
https://WEBCLIENTSERVER:9443/vsphere-client
Another thing I noticed was that the administrator@vsphere.local was administrator on the vcenter. In 5.1 admin@system-domain did not have any vCenter permissions set.

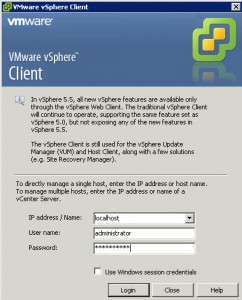
The only place to configure the SSO is through the Web Client. When you log in with your vSphere Client in a 5.5 environment you will be presented with the following warning
You can access the vCenter Web Client on the following url:
https://WEBCLIENTSERVER:9443/vsphere-client
Another thing I noticed was that the administrator@vsphere.local was administrator on the vcenter. In 5.1 admin@system-domain did not have any vCenter permissions set.
The only place to configure the SSO is through the Web Client. When you log in with your vSphere Client in a 5.5 environment you will be presented with the following warning

Friday, February 6, 2015
How to change the IP Address of ESXi through the command line
Use VI to edit /etc/vmware/esx.conf or use the following command to manually view the IP address; ~#esxcli network ip interface ipv4 getThis will give you the list of all VMkernel interfaces with their details (See screenshot below). Changing the IP address is just a matter of adding some parameters:
~#esxcli network ip interface ipv4 set -i vmk(?) -I 10.10.10.10 -N 255.255.255.0 -t staticIn your situation you will need to replace “vmk(?)″ with the appropriate VMkernel NIC and change the IP details.

How to disable ESXi firewall vis the command line
When you need to troubleshoot and you need to eliminiate the firewall as the possible cause just log onto the ESXi console and disable the firewall via the CLI.Use the following command: ~#esxcli network firewall set --enabled falseThis will disable it permanently.
Changing the load balancing policy in ESXi using CLI 5.1
To change the load balancing policy on an ESXi 5.x standard vSwitch, run this command:
esxcli network vswitch standard policy failover set -l iphash -v vSwitch0
for the portgroup, run this command:
esxcli network vswitch standard portgroup policy failover set -p "Management Network" -l "iphash"
On ESXi 5.x,
- To change the load balancing policy to a route based on the originating virtual port ID, run this command:
esxcli network vswitch standard policy failover set -l portid -v vSwitch0
- To change the load balancing policy to a route based on the MAC hash, run this command:esxcli network vswitch standard policy failover set -l mac -v vSwitch0
To Set the NIC teaming policy on a Virtual Switch on an ESXi 5.x
- To list the current NIC teaming policy of a vSwitch, use the command:
# esxcli network vswitch standard policy failover get -v vSwitch0
- To set the NIC teaming policy of a vSwitch, use this command:
# esxcli network vswitch standard policy failover set -l policy -v vSwitchXFor example, to set the NIC teaming policy of a vSwitch to IP hash:
# esxcli network vswitch standard policy failover set -l iphash -a uplink=vmnic0,vmnic4 -v vSwitch0Note: Available Policy Options:
- explicit = Use explicit failover order
- portid = Route based upon port id (This is the Default setting)
- mac = Source Based Upon MAC Hash
- iphash = Source based up IP hash (This is only to be used in a etherchannel\Portchannel)
Subscribe to:
Posts (Atom)