Thursday, December 18, 2014

Troubleshooting and Frequently Asked Questions for space reclamation in VMware Horizon View 5.2.x and 5.3.x (2039907)


Cause

For the space reclamation feature to work correctly, ensure that:
  • VMware Tools provided with vSphere version 5.1 or later are installed on the virtual machine.
  • The virtual machine is using virtual hardware version 9 or later.
  • In the View Administrator console, the Reclaim VM disk space option is selected for the vCenter Server. For more information, see Allow vSphere to Reclaim Disk Space in Linked-Clone Virtual Machines in the VMware Horizon View 5.2 Administration Guide
  • In the View Administrator console, the Reclaim VM disk space option is selected for the desktop pool. For more information, see Reclaim Disk Space on Linked-Clone Desktops in the VMware Horizon View 5.2  Administration Guide.
  • The virtual machine is powered on before you initiate the space reclamation operation.
  • There is space that can be reclaimed. This space exists when data is deleted from the guest OS. Sending files to the Recycle Bin does not delete them.
  • The virtual machine is using SCSI disks.
  • Changed Block Tracking (CBT) is disabled on the parent virtual machine.

Resolution

This is a list of possible issues you may encounter with the space reclamation feature in VMware Horizon View 5.2 or 5.3.

Issue 1

Symptom:
In vCenter Server tasks, you see the error:

Task: Wipe a Flex-SE virtual disk
Status: A general system error occurred: Wipe Disk failed: Failed to complete wipe operation.


Possible cause:
VMware Tools has not been upgraded to the latest version provided with the host, which must be version 5.1 or later.

Resolution:
Upgrade the VMware Tools in the guest OS, then reboot the guest OS.


Issue 2

Symptom:
  • The vmware.log in the virtual machine folder contains messages similar to:

11-14T18:48:52.922Z| vcpu-0| I120: ToolsRpcDiskWipeProgress: progress response: No wipable disks found
11-14T18:48:52.922Z| vcpu-0| W110: DiskVigorWipeProgressCB: Wipe progress RPC Error: No wipable disks found


Possible cause:
The virtual machine does not have SCSI disks.

Resolution:
The disk (the OS virtual disk in View) must be SCSI, not IDE. Space reclamation does not work on IDE virtual disks.


Issue 3

Symptoms:
  • When space reclamation is launched, you see this event in vCenter Server:

    General system error: Wipe disk failed
  • In the vmware.log file, you see messages similar to:

    2012-11-22T19:53:16.006Z| vcpu-0| I120: ToolsRpcDiskWipeProgress: progress response: No wipable disks found

    2012-11-22T19:53:16.006Z| vcpu-0| W110: DiskVigorWipeProgressCB: Wipe progress RPC Error: No wipable disks found


  • In the VMware Tools log file, you see messages similar to:

    [Nov 23 14:44:55.646] [    info] [vmsvc] Could not initialize backend for drive C:\: 50
    [Nov 23 14:44:55.646] [ warning] [diskWiper] Mount point C:\ is not wipable
    [...]
    [Nov 23 14:44:55.646] [    info] [vmsvc] Device specifically advertises its NON-TP nature, bailing out.
    [Nov 23 14:44:55.646] [    info] [vmsvc] Failed to get Initialize SCSI Backend TP Device \\.\PhysicalDrive2 status 50.


  • When you run the grep scsi *vmx command, you see output similar to:

    $ grep scsi *vmx

    scsi0:0.present = "TRUE"
    scsi0:0.fileName = "wlabsetest1-checkpoint.vmdk"
    scsi0:0.deviceType = "scsi-hardDisk"
    scsi0:0.ctkEnabled = "TRUE"
Cause:
CBT is enabled for the virtual machine.

If CBT is enabled on an SE sparse disk based pool, then space reclamation does not work.

Resolution:
To work around this issue, disable CBT on the parent virtual machine and recompose the pool.

Disable CBT for the OS disk (typically scsi0:0 ). For more information, see Enabling Changed Block Tracking (CBT) on virtual machines (1031873).

Note: Space reclamation only affects the OS disk, so disable the CBT on the OS disk only.

vMotion fails at 68% with the error: An error occurred restoring the virtual machine state during migration (2012207)

Symptoms

  • Cannot vMotion a virtual machine.
  • vMotion fails at 68%.
  • You see these error:
    • A General System Error
    • Failed to receive migration.An error occurred restoring the virtual machine state during migration.
  • If you navigate to the Virtual Machine folder, you see three vswp files instead of two
  • When using Windows 8, you observe errors in the vmware.log similar to:

    11-01T15:39:00.158Z| vmx| DUMPER: Item 'CtrCountX' [-1, -1] not found.
    11-01T15:39:00.158Z| vmx| VMGenCtrCheckpoint: Failing restore from old Win8 checkpoint

    Cause

    This issue occurs if the state of the virtual machine cannot be determined from the .vmx file.
    Starting with ESXi 5.0, by default, each virtual machine has two vswp files when the virtual machine is powered on. This issue occurs when the machine has three vswp files, instead of two.

    Resolution

    To work around this issue in a View environment:
    1. Log in to the VMware View Administrator page.
    2. Click Inventory > Desktop.
    3. Click the virtual machine for which vMotion failed.
    4. Click the More commands drop down and select Enter Maintenance Mode.
    5. In vCenter Server, right-click the virtual machine and click Power > Power off.
    6. Right-click the datastore and browse to the virtual machine storage location.
    7. Verify that the vswp files are no longer present.
    8. Right-click the virtual machine and click Power > Power On

      Note: Do not use Restart or Reset.

    9. Right-click the datastore and browse to the virtual machine storage location.
    10. Verify that the virtual machine has only two vswp files.
    11. Perform the vMotion again.
    To work around this issue in a non-View environment:
    1. Connect to vCenter Server using the vSphere Client.
    2. Right-click the virtual machine and click Power > Power off.
    3. Right-click the datastore and browse to the virtual machine storage location.
    4. Verify that the vswp files are no longer present.
    5. Right-click the virtual machine and click Power > Power On

      Note: Do not use Restart or Reset.

    6. Right-click the datastore and browse to the virtual machine storage location.
    7. Verify that the virtual machine has only two vswp files.
    8. Perform the vMotion again.
    If the issue persists and you still see three vswp files:
    1. Connect to vCenter Server using the vSphere Client.
    2. Right-click the virtual machine and click Power > Power off.
    3. Right-click the datastore and browse to the virtual machine storage location.
    4. Right-click the vswp file and click Move To.
    5. Expand and select a temporary destination location where you want to save the the files and then click Move. You can also rename the vswp file.
    6. Right-click the virtual machine and click Power > Power On.

      Note: Do not use Restart or Reset.

    7. Right-click the datastore and browse to the virtual machine storage location.
    8. Verify that the virtual machine has only two vswp files.
    9. Perform the vMotion again.

Saturday, December 13, 2014

Connecting to VMware View ADAM Database (2012377)


Note: Ensure to take a complete backup of the ADAM database before proceeding. For more information, see Performing an end-to-end backup and restore for View Manager (1008046).

Windows Server 2003

To connect to the View ADAM database:
  1. Log in to one of the View Connection Servers as the domain administrator.
  2. Click Start > Programs > ADAM > ADAM ADSI Edit.
  3. In the console window, right-click ADAM ADSI Edit and Click Connect to.
  4. Under Connection name, type View ADAM Database.
  5. Under Server name ensure localhost is selected.
  6. Under Port ensure 389 is entered.
  7. Under Connect to the following node, Select Distinguished name (DN) or naming context.
  8. In the field under Distinguished name (DN) or naming context type:

    dc=vdi,dc=vmware,dc=int
  9. Click OK.
  10. Click View ADAM Database [localhost:389] to expand.
  11. Click DC=vdi,dc=vmware,dc=int to expand.

Windows Server 2008

To connect to the View ADAM database:
  1. Log in to one of the View Connection Servers as Domain Administrator.
  2. Click Start > Administrative Tools > ADSI Edit.
  3. In the console window, right-click ADSI Edit and Click Connect to.
  4. In the Name field type:

    View ADAM Database
  5. Select Select or type a Distinguished Name or Naming Context.
  6. In the field below Select or type a Distinguished Name or Naming Context, type:

     dc=vdi,dc=vmware,dc=int
  7. Select Select or type a domain or server.
  8. In the field below Select or type a domain or server, type:

     localhost:389

  9. Click OK.
  10. Click View ADAM Database [localhost:389] to expand.
  11. Click DC=vdi,dc=vmware,dc=int to expand.
Note: If you are unable to connect using dc=vdi,dc=vmware,dc=int, try using dc=vdi;dc=vmware;dc=int.

Wednesday, December 3, 2014

VMKcore partitions on ESXi hosts with non-local Disks

When running ESXi from local storage, a VMKcore partition is created during install.
If your ESXi Host 5.0/5.1/5.5 experiences a Purple Screen Of Death (PSOD), it hopefully creates a diagsnostic coredump. This coredump contains useful information for root cause analysis.

When a PSOD should occur, you can retrieve the dump information using the esxcfg-dumppart command: esxcfg-dumppart –log <ESX dump file> or esxcfg-dumppart –L <ESX dump file> from a shell session.

If there is no available disk partition for a coredump on your ESXi host, such as in Auto-Deploy or "USB/Memcard installs" where there is no local disks, you will get the following error message:

No vmkcore disk partition is available and no network coredump server has been configured. Host core dumps cannot be saved.

In such configuration cases, it is better to move the core dumps to a datastore. This has to be a VMFS volume, which rules out NFS. Since the vmkcore dump partition has to be available at boot time, software iSCSI is ruled out too. Only hardware iSCSI or FC LUNs are possible.

Setting VMKcore partition
The following steps are needed to configure the vmkcore partition. In my example I’m using a 10GB LUN provisioned by iSCSI.
Create the LUN
On my shared storage I created a 10GB iSCSI target and assigned it to my ESXi host. Then on the ESXi host you add the iSCSI target. Do a rescan and then add the iSCSI target like you would normally add a new datastore by pressing the “Add Storage” option in the Storage menu on the configuration tab. Choose to add a Disk/LUN and name it something like: vmkcore-esx01. After a rescan the LUN should be available in your storage view.
Change the partition type
Now the datastore needs to have the disk type changed. To do this you will have to logon to the ESXi host using tech support mode. After you are logged in, list all partitions using the fdisk -l command. You will now see a list of partitions in which you should search for your 10GB disk. In my case it looked like:
Disk /dev/disks/naa.5000144f33903730: 10.7 GB, 10737418240 bytes
255 heads, 63 sectors/track, 1305 cylinders
Units = cylinders of 16065 * 512 = 8225280 bytes
Now to change the partition type, run fdisk /dev/disks/naa.5000144f33903730 (copy it from your fdisk list). In fdisk hit “t” to change the partition’s ID, then hit “fc” to change the partition type to VMKcore. Now hit “w” to write the partition table and exit fdisk.
Set and activate the partition
The last step is now to tell ESXi to use a new vmkcore partition using the following command. First we double check for suitable vmkcore partitions:
esxcfg-dumppart –f
 
If the fdisk action went well, you should now see the /dev/disks/naa.5000144f33903730 partition again in the list. To set the partition use the following command:
esxcfg-dumppart -s naa.5000144f33903730:1
If you receive the message: “Unable to set dump partition naa.5000144f33903730:1. 
Use the command switch -a to activate the partition using the following command:
esxcfg-dumppart -a naa.5000144f33903730:1

Friday, October 24, 2014

Configuring SNMP v1/v2c/v3 Using ESXCLI 5.1

To access the new SNMP namespace in ESXCLI, you just need to run the following command: esxcli system snmp

Note: ESXCLI is available in both the ESXi Shell as well as remotely via vCLI 5.1 or through PowerCLI’s Get-EsxCli cmdlet. You will also need to be running ESXi 5.1 to see the new SNMP namespace.
We have a very thorough walk through of SNMP v1, v2c, and v3 configurations using ESXCLI in our documentation which can be found here, but I thought I quickly show you how easy it is to configure both a SNMP v1/v2c and v3 for your ESXi hosts.

SNMP v1 Configurations:

There are 4 steps:
  1. Set the community string
  2. Set the SNMP target which includes the port and the community string
  3. Enable SNMP service on the ESXi host
  4. Validate SNMP configuration by performing a test operation
esxcli system snmp set –communities public
esxcli system snmp set --targets esxi-host.local@161/public
esxcli system snmp set --enable true
esxcli system snmp test
Another way you can check to ensure you can reach the ESXi host from your SNMP target system is by using the snmpwalk utility which is available on most UNIX/Linux systems. Run the following command which requires you to specify the SNMP version, the community string and the hostname or IP Address of the ESXi host:
snmpwalk -v1 -c public esxi-host
If the command was successful, then you should see a huge list of SNMP data being returned from the ESXi hosts.

SNMP v2c Configurations:

SNMP v2c configuration is similar to SNMP v3 configuration but without any authentication or privacy protocols configured.
There are 4 steps:
  1. Set the community string
  2. Configure an SNMP user and we will use the “-” symbol for no authentication or privacy protocols.
  3. Set the SNMP target which includes the port and user in our previous step
  4. Enable SNMP service on the ESXi host
  5. Validate SNMP configuration by performing a test operation
esxcli system snmp set –c public
esxcli system snmp set –users john/-/-/none
esxcli system snmp set –t x.x.x.x@161/community/none/trap
esxcli system snmp set –e true
esxcli system snmp test
Again, we can verify using the snmpwalk utility just like we did in the v1 example but now we will need to include the username that we had configured. To validate, run the following command:
snmpwalk -v2c -c public -u john esxi-host
Note: There currently is not an SNMP v2c specific example in the ESXCLI documentation, but we are looking to update the documentation with this example.

SNMP v3 Configurations:

There are 8 steps (not all are applicable):
  1. Set the engine Id (need to convert string to hexidecimal string)
  2. Set the authentication protocol which either be SHA1, MD5 or none
  3. Set the privacy protocol which can be AES128 or none
  4. Generate the authentication and privacy hash from the user supplied passwords if either protocols were enabled. You can either provide a file that has the password or use the -r flag which specifies the raw input password
  5. Configure an SNMP user and associating the authentication and privacy hash from the previous step
  6. Set the SNMP target which includes the port and user
  7. Enable SNMP service on the ESXi host
  8. Validate SNMP configuration by performing a test operation
esxcli system snmp set –engineid 766d77617265
esxcli system snmp set –authentication SHA1
esxcli system snmp set –privacy AES128
esxcli system snmp hash -r -A secret1234 -X secret5678
esxcli system snmp set –users william/f9f7311379046ebcb5d134439ee5b7754da8a90f/d300f16eec59fb3b7ada7844ff764cbf4641fe5f/priv
esxcli system snmp set –v3targets esxi-host@161/john/priv/trap
esxcli system snmp set –enable true
esxcli system snmp test
You can also use the snmpwalk utility to query an SNMPv3 host and using the information we supplied earlier to configure SNMP on the ESXi host. To do so, run the following command (you will need to specify the v3 specific flags which includes the username, authentication/privacy password as well as the authentication & privacy protocols):
snmpwalk -v3 -u john -l AuthPriv -a SHA -A secret1234 -x AES -X secret5678 esxi-host

Now that you know how to configure SNMP settings for a single ESXi host, how do you go about applying this across all your ESXi hosts, say 100 or 10,000? There are several ways which will depend on how your environment is setup. If you are using vCenter Server to centrally manage your ESXi hosts, then you can easily proxy ESXCLI authentication using vCenter Server and you do not need to specify the login credentials to each and every ESXi host. Here is an example of connecting to an ESXi host called esx-1.local which is being managed by vcenter-1.local and we will enable the SNMP test command:
esxcli –server vcenter-1.local –vihost esxi-1.local system –user administrator snmp test
Notice, instead of specifying the hostname of the ESXi host we are using the –server flag, to specify the vCenter Server and –vihost to specify the specific ESXi host we would like to operate on. Finally, we will also need to provide the credentials to connect to the vCenter Server.
If you are not using vCenter Server or prefer to connect to each individual ESXi hosts, then you will need to specify the individual credentials to each ESXi host. You also can interact with the ESXCLI interface using PowerCLI if you are more familiar with that by using the Get-EsxCli cmdlet.
In all three options, you simply just need to specify a list of ESXi hosts which can then be read from a flat text file, CSV, etc. and place the ESXCLI commands in a “for” loop which will iterate through the list of ESXi hosts and apply the SNMP configurations.

Tuesday, October 14, 2014

vCenter Update Manager fails "does not have db_owner privilege on MSDB database"

Database owner privileges error during vCenter Update Manager install

Another vCenter Update Manager install problem!
The DB user entered does not have the required permissions needed to install and configure VMware Update Manager with the selected DB. Please correct the following error(s) : The database user “ does not have db_owner privilege on the MSDB database.

image
Cause: You’ll encounter this problem if you are using a service account to install VUM. To solve this, temporarily give the service account the sysadmin server role. To do this, perform the following tasks.

  1. Open the Microsoft SQL Server Management Studio
  2. In the Object Explorer, navigate to Security > Logins
  3. Right-click on the user you’re using to install VUM then click Properties.
  4. Click Server Roles
  5. Select sysadmin then click OK.

image

Once you’ve installed VUM, you can remove the the sysadmin role from the service account.

Monday, August 25, 2014

View Composer Fault: Unable to decrypt credentials for component Unknown and configID: null

When trying to recompose, deploy, or restart Linked-clone pools I keep getting this error.

View Composer Fault: Unable to decrypt credentials for component Unknown and configID: null

I'm currently running the following:

vCenter 5.1.0  Build 1473063
View Connection 5.3
View Composer 5.3


Fix:

In View Horizon Administrator, View Configuration, Servers select your vCenter Server and click "Edit". In the "Edit vCenter Server" tab, select the "Edit" button under "vCenter Server Settings" and try using another account other than the one that is currently selected. Make sure it authenticates and then change it back to the original account.
Try another maintenance move within one of your pools again and see if it works now! This worked in our situation.

What we found out is when this account is configured the first time, View Horizon will cache those credentials for ease of use when trying to deploy 100 or 1000 VM desktops. You wouldn't want View Horizon to authenticate each time a VM gets deployed, it would bogg down your Domain Controllers and/or saturate your network with authentication requests.

NOTE:We used the same vCenter server name in our case because we had to rebuild our vCenter server due to a Microsoft Patch that crashed our working server.

Monday, April 14, 2014

Deploying or recomposing View desktops fails when the parent virtual machine has CBT enabled (2032214)

  • In the /var/log/vmware/vpxa.log file on the ESXi host, you see entries similar to:
DISKLIB-CTK : Could not open tracking file. File open returned IO error 4.
DISKLIB-CTK : Could not open change tracking file "/vmfs/volumes/<UUID>/<parent vm name>-ctk.vmdk": Could not open/create change tracking file.
DISKLIB-LIB : Could not open change tracker /vmfs/volumes/<UUID>/<parent vm name>-ctk.vmdk: Could not open/create change tracking file.
DISKLIB-LIB : Failed to open '/vmfs/volumes/<UUID>/<parent vm name>-000002.vmdk' with flags 0x21e Could not open/create change tracking file (2108).
[NFC ERROR] NfcFileDskOpenDisk: Failed to open '/vmfs/volumes/<UUID>/<parent vm name>-000002.vmdk': Could not open/create change tracking file (2108).
[NFC ERROR] NfcFile_Open: Open failed:
[NFC ERROR] NfcFile_Clone: Failed to open source file
[VpxNfcClient] File transfer [ds:///vmfs/volumes/<UUID>/<parent vm name>-000002.vmdk-> ds:///vmfs/volumes/<UUID>/replica-<id>/replica-<id>.vmdk] failed.
[VpxNfcClient] NFC file error for file ds:///vmfs/volumes/<UUID>/<parent vm name>-000002.vmdk
[VpxNfcClient] Closing NFC connection to server


Resolution

To work around this issue, disable CBT on the parent virtual machine. Ensure that there are no snapshots on the parent virtual machine. For more information, see Consolidating snapshots in vSphere 5.x (2003638).

To disable CBT:
  1. Power off the virtual machine.
  2. Right-click the virtual machine and click Edit Settings.
  3. Click the Options tab.
  4. Click General under the Advanced section, then click Configuration Parameters
  5. Set the ctkEnabled parameter to false for the corresponding SCSI disk.
To prevent any third-party applications from enabling Change Tracking on the virtual machine:
  1. Open the .vmx file of the virtual machine using a text editor.
  2. Add this entry to the file:

    ctkDisallowed="true"

Thursday, April 10, 2014

Netapp VSC 4.1 Plugin vCenter - Optimization and Migration

One of my most frequently read articles is on how to use MBRAlign to align your virtual machine disks on Netapp storage. Well, after Netapp has released their new Virtual Storage Console (VSC4) the tedious task of using MBRAlign might be eased for some admins.

Optimization and Migration
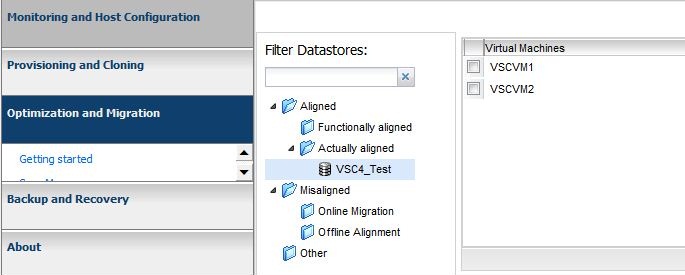
The new VSC4 console for vSphere has a new tab called Optimization and Migration. Here you are able to scan all or some of your datastores to check the alignment of your virtual machines. The scan manager can even be set on a schedule so that changes to the datastore will be recognized.
VSC_Datastores_Scan

Once you have scanned your datastores you can go the the Virtual Machine Alignment section and see if your virtual machines are aligned.
VSC_Actually_Aligned2
What if your virtual machines are not aligned already? Netapp has a new way to align your virtual machines without having to take them offline.
 
Disclaimer: I’ve looked for documentation on exactly how this process works, but couldn’t find any.


Aligning Virtual Machines
Lets go through the process of aligning a misaligned virtual machine using VSC4.
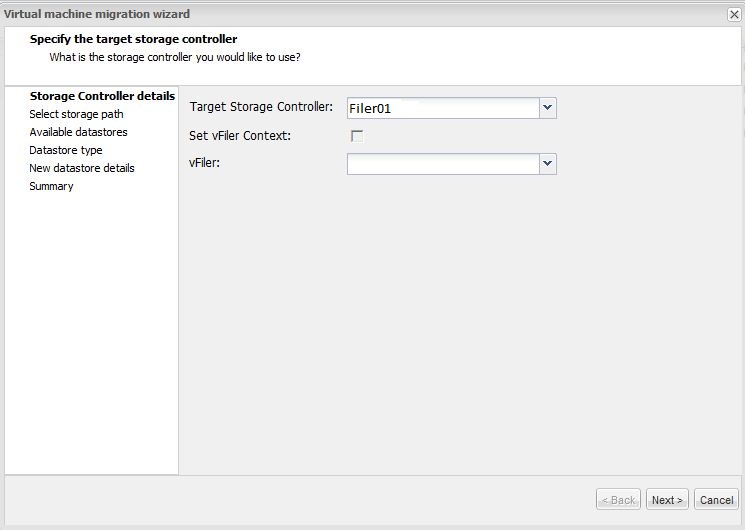
First, we select the virtual machine that is misaligned and choose the migrate task. This opens the alignment wizard.

Choose your filer.
VSC_WIZ1

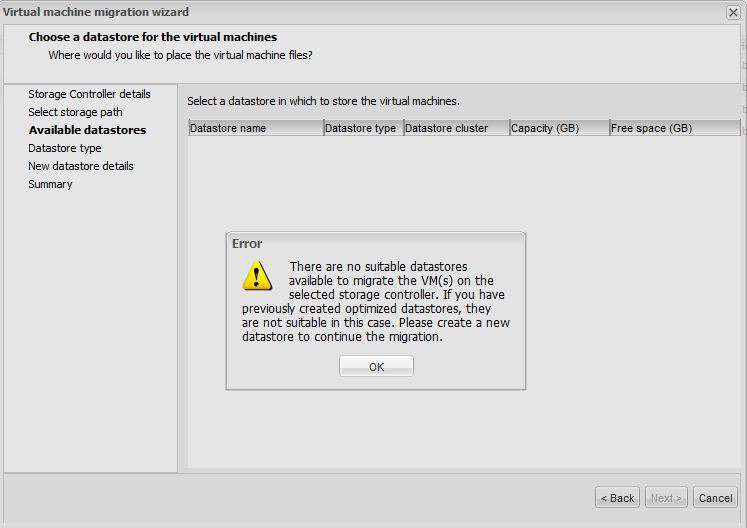
Next choose a datastore. If we already have a functionally aligned datastore with an offset that’s the same as your unaligned virtual machine’s offset, you can select an existing datastore. If you don’t have an existing datastore that will align with your vm, you’ll receive an error message like the one below. If that’s the case, create a new datastore from the wizard.
VSC_WIZ3

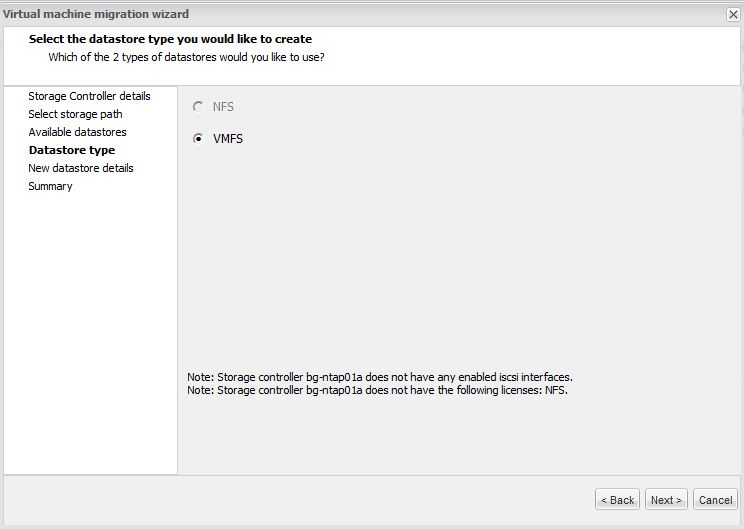
Choose the datastore type.
VSC_WIZ4

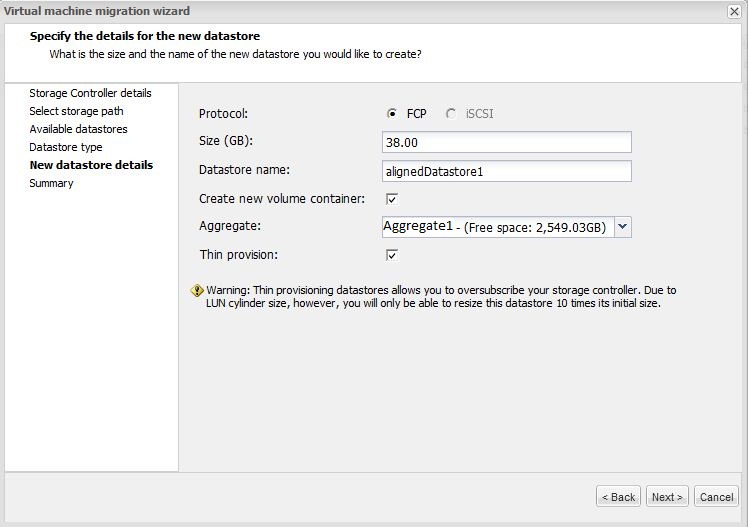
In our case we’ll create a new datastore.
VSC_WIZ5

Once the migration is complete you’ll see your virtual machine in a new datastore and it will be aligned. Notice how the virtual machine offset matches the name of the new datastore that was created. Offset 7 was put into the AlignedDatastore1_optimized_7 datastore.
VSC_FunctionallyAligned

Now you can rest easy, knowing that your virtual machines are not suffering performance issues due to unaligned disks, and no downtime was required to do so.

Wednesday, April 9, 2014

VDR - Cannot take a quiesced snapshot of Windows 2008 R2 virtual machine error -3960

* Backup applications, such as VMware Data Recovery, fail with the error:

Failed to create snapshot for <vmname>, error -3960 (cannot quiesce virtual machine)


====================Solution=============================================

This is not a VMware issue.

This issue occurs due to a known issue with VSS application snapshots and ESXi/ESX 4.1 and later.

To work around this issue, disable VSS application-based snapshots and revert back to file system quiesced snapshots.

Notes:

Option 1 - Disable VSS application quiescing using the vSphere Client:
  1. Power off the virtual machine.
  2. Log into vCenter Server or the ESXi/ESX host through the vSphere Client.
  3. Right-click the virtual machine and click Edit settings.
  4. Click the Options tab.
  5. Go to Advanced > General > Configuration Parameters.
  6. Add or modify the row disk.EnableUUID with the value FALSE.
  7. Click OK to save.
  8. Click OK to exit.
  9. Right-click the virtual machine and click Remove from Inventory to unregister the virtual machine from the vCenter Server inventory.
  10. Register the virtual machine back to vCenter Server. For more information, see Registering or adding a virtual machine to the inventory on vCenter Server or on an ESXi/ESX host (1006160).

    Note: If this change is done via the command line, use vim-cmd command to reload the vmx is enough to see the changes. For more information, see Reloading a vmx file without removing the Virtual machine from inventory (1026043).
  11. Power on the virtual machine.
Note: To configure the disk.EnableUUID parameter for VMware Data Protection (VDP), see the Resolution section in Backing up a Windows Server 2008 R2 virtual machine using VMware Data Protection 5.1 fails with the error: Execution Error: E10055:Failed to attach disk. (2035736).


Option 2 - Disable VSS application quiescing using VMware Tools:
  1. Open the C:\ProgramData\VMware\VMware Tools\Tools.conf file in a text editor, such as Notepad. If the file does not exist, create it.
  2. Add these lines to the file:

    [vmbackup]
    vss.disableAppQuiescing = true

  3. Save the file.
  4. Exit the editor.
  5. Restart the VMware Tools Service for the changes to take effect. Click Start > Run, type services.msc, and click OK.
  6. Right-click the VMware Tools Service and click Restart.

Tuesday, April 8, 2014

The 4 Most Common Misconfigurations with NetApp Deduplication

Misconfiguration #1 - Not turning on dedupe right away (or forgetting the -s or scan option)

As Dr. Dedupe pointed out in a recent blog, NetApp recommends dedupication on all VMware workloads. You may have noticed that if you use our Virtual Storage Console (VSC) plugin for vCenter that creation of a VMware datastore using the plugin results in dedupe being turned on. We recommend enabling dedupe right away for a number of reasons but here is the primary reason why;

Enabling dedupe on a NetApp volume (ASIS) starts the controller tracking the new blocks that are written to that volume. Then during the scheduled deduplication pass the controller looks at those new blocks and eliminates any duplicates. What if, however, you already had some VMs in the volume before you enabled deduplication? Unless you told the NetApp specifically to scan the existing data, those VMs are never examined or deduped! This results in the low dedupe results. The good news, this is a very easy fix. Simply start a deduplication pass from the VSC with the “scan” option enabled or from the command line with the “-s” switch.

dedupmgmt1.pngAbove, where to enable a deduplication volume scan in VSC. Below, how to do one in Systems Manager;


dedupmgmt2.png
For you command line guys its "sis start -s /vol/myvol" note the -s, amazing what 2 characters can do!


This is by far is the most common mistake I come across but thanks to more customers provisioning their VMware storage with the free VSC plug-in it is becoming less common.


Misconfiguration #2 - LUN reservations

Thin Provisioning has gotten a bad reputation in the last few years. Storage admins who have been burned by thin provisioning in the past tend to get a bit reservation happy. On a NetApp controller we have multiple levels of reservations depending on your needs but with regard to VMware two stand out. First there is the volume reservation. This reserves space away from the large storage pool (the Aggregate) and insures whatever object you place into that volume has space. Inside the volume we now create the LUN for VMware. Again you can choose to reserve the space for the LUN which removes the space away from the available space in the volume. There are two problems with this. First, there is no need to do this. You have already reserved the space with the volume reservation, no need to reserve the space AGAIN with a LUN reservation. Second, the LUN reservation means that the unused space in the LUN will aways consume the space reserved. That is, a 600GB LUN with space reservation turned on will consume 600 GB of space with no data in it. Deduping a space reserved LUN will yeild you some space from the used data but any unused space will remain reserved.


For example say I had a 90GB LUN in a 100GB volume and the LUN was reserved. With no data in the LUN the volume will show 90GB used, the unused but reserved LUN. Now I place 37 GB of data in the LUN. The volume will still show 90GB used. No change. Next I dedupe that 37 GB and say it dedupes to 10GB. The volume will no report 63 GB used since I reclaimed 27GB from deduping. However when I remove the LUN reservation I can see the data is actually taking up only 10GB with the volume now reporting 90GB free. [I updated this section from my orginal post, Thanks to Svetlana for pointing out my error here]

In these occasions, a simple deselection of the LUN reservation reveals the actual savings from dedupe (yes this can be done live with the VMs running). Once the actual dedupe savings are displayed (likely back in that 60-70% range) we can adjust the size of the volume to suit the size of the actual data in the LUN (yes, this too can be done live)


dedupmgmt3.png

Misconfiguration #3 - Misaligned VMs

The problem with some guest operating systems being misaligned with the underlying storage architecture has been well documented. In some cases though this misalignment can cause lower than expect deduplication numbers. Clients are often surprised (I know I was) at how many blocks we can dedupe between unlike operating systems. That is, between say Windows 2003 and 2008 or Windows XP and 2003. However if the starting offset of one of the OS types is different that the starting offset of the other then almost none of the blocks will align.

In addition to lowing your dedupe savings and using more disk space that required, misalignment can also place more load on your storage controller (any storage controller, not a NetApp specific problem). Thus it is a great idea to fix this situation. There are a number of tools on the market that can correct this situation including the MBRalign tool which is free for NetApp customers and included as part of the VSC. As you align the misaligned VMs, you will see your dedupe savings rise and your controller load decrease. Goodness!


Misconfiguration #4 - Large amounts of data in the VMs

Now this one isn’t really a misconfiguration, it's more of a design option. You see, most of my customers do not separate their data from their boot VMDK files. The simplicity  of having your entire VMs in a single folder is just too good to mess with. Customers are normally still able to achieve very high deduplication ratios even with the application data mixed in with the OS data blocks. Sometimes though customers have very large data files such as large database files, large image file repositories or large message datastores mixed in with the VM. These large data files tend not to deduplicate well and as such drive down the percentage seen. No harm is done though since the NetApp will deduplicate the all the OS and other data around these large sections. However the customer can also move these VMDKs off to other datastores which can then expose the higher dedupe ratios on the remaining application and OS data. Either option is fine.

So there it is, the 4 most common misconfigurations I see with deduplication on NetApp in the field. Please feel free to post and share your savings, we always love to hear from our customers directly.

Monday, March 3, 2014

Expanding the size of a Raw Device Mapping (RDM) attached to a VM


Warning: Ensure that there are no snapshots on the disk before attempting this operation. If there are snapshots present, commit them. Otherwise, you may experience data corruption (as described in Extending a RDM with snapshots may cause corruption (1005351). For more information, see Determining if there are leftover delta files that VMware Infrastructure Client cannot detect (1005049).

Note: Snapshots can only be taken with RDMs in Virtual Compatibility Mode. If you do not want to use snapshots, the maximum mapped LUN size in Physical Compatibility mode is 2 TB - 512 bytes in ESX/ESXi 4.x and 64TB in ESX/ESXi 5.x. For more information, see ESX/ESXi 3.x/4.x do not support 2-terabyte LUNs-125339 (3371739) and Calculating the overhead required by snapshot files (1012384).

The procedure to expand the size of the RDM depends on the type:
  • Physical compatibility mode

    Physical compatibility mode RDMs, which are also known as passthru RDMs, expose the physical properties of the mapped LUN to the guest operating system. For the guest operating system to recognize the added space to the expanded mapped LUN, perform a rescan from the ESX host, then from the guest operating system. This process does not require rebooting the virtual machine or the ESX host.

    No changes to the RDM files (.vmdk or metadata pointer) are required to take advantage of the added disk space.

  • Virtual compatibility mode

    To safely expand the RDM:
    1. Stop the virtual machine and remove the RDM from the virtual machine. Before you do this, note the scsiX:Y position of the RDM in VM Settings.
    2. Expand the RDM LUN from the SAN side. Contact your vendor for assistance.
    3. Perform rescan on the ESX and verify the new LUN size is observed.
    4. Recreate the RDM mapping to update the mapped disk size using one of these methods:
      • Utilize Storage vMotion to migrate the Virtual RDM disk's pointer file (vSphere 4.0 and later).
      • Power off the virtual machine, click VM Settings > Add > Hard Disk > RDM, select the scsiX:Y position that the RDM was using before, and then power on the virtual machine.
    5. Perform a rescan from the guest operating system. Consult your vendor for assistance. 

Wednesday, January 29, 2014

Event Viewer being flooded with VMWare Tools [Warnings]vmstat

If you have this setting "isolation.tools.setinfo.disable = "true" this means that Setinfo communication from tools to the ESXi host are being blocked" .


Modify the following line from the .vmx and set the value to "false"

isolation.tools.setinfo.disable = "true"
 
Note :  take backup of vmx file before editing.


Refer this Link for more detail about this parameter  page 6  http://www.vmware.com/files/pdf/vi35_security_hardening_wp.pdf